Office 365: New Features

Microsoft is working hard to update Office 365 by adding new features and improving the overall user experience. I am very excited for the following new features. Note that some of these features are already live, being rolled out or still being developed.

Teams

The number of participants who can be viewed simultaneously in a meeting is now nine. This is a great update; this will help the meetings to go smoother.

You can now raise a hand in teams. By virtual raising your hand, you can signal to the speaker or organizer that you want to speak.

  • During a Teams meeting go to the options bar.
  • Click on the hand icon.

In Teams you can now instantly pop out your chat into a separate window! But thats not all you can also, resize, reposition, or close the window as you wish. You can pop out multiple conversations at the same time.

  • Click on the pop out icon to pop out the chat.
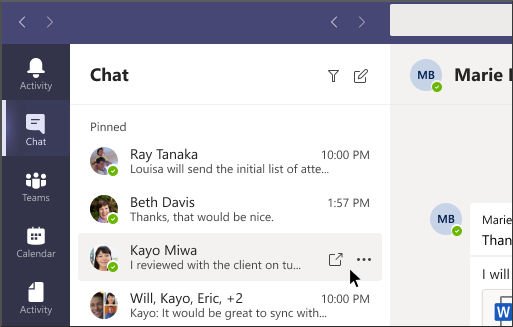
Pop out chat button screenshot

Modern Lists

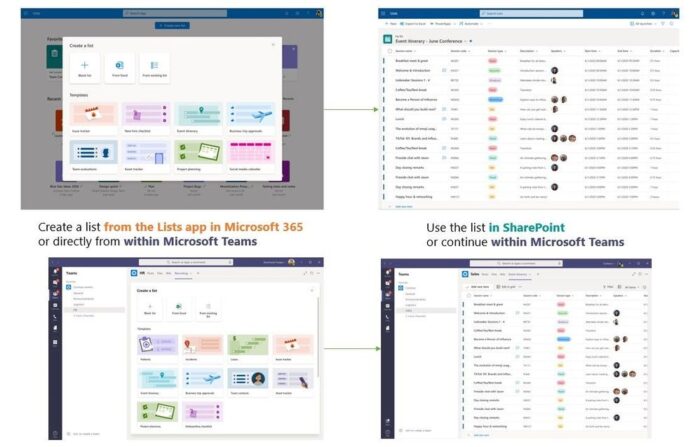
Modern Lists has been announced, at this moment it is unknown when it will be released. With Modern Lists the platform will reach a new level of flexibility and maturity, the possibilities seem endless.

Yammer

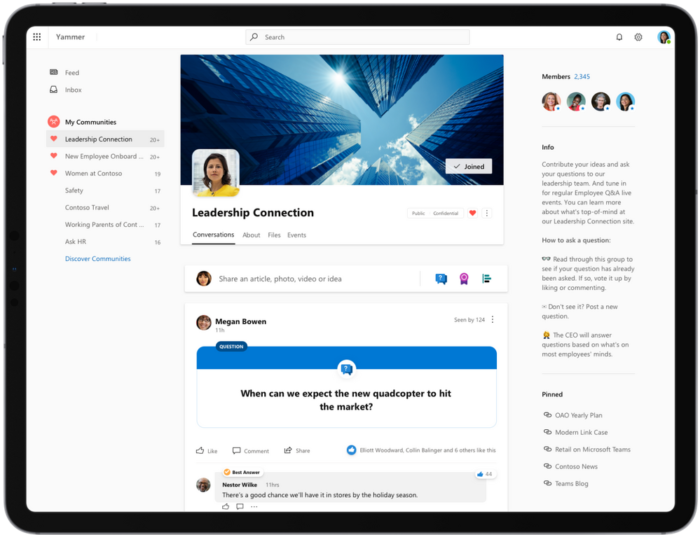
The new Yammer is in public preview and it looks great. I listed a few of my favorites below. You can find all the details in the Microsoft announcement.

  • You can now pin your favorite communities (formerly known as groups) to the navigation for quick access.
  • The integration with Outlook, Teams and SharePoint has been update and works smoother.
  • You can brand Yammer with your company logo!
  • Posts can now be reported to make it easier to moderate your communities.
  • You can now search and filter easier.

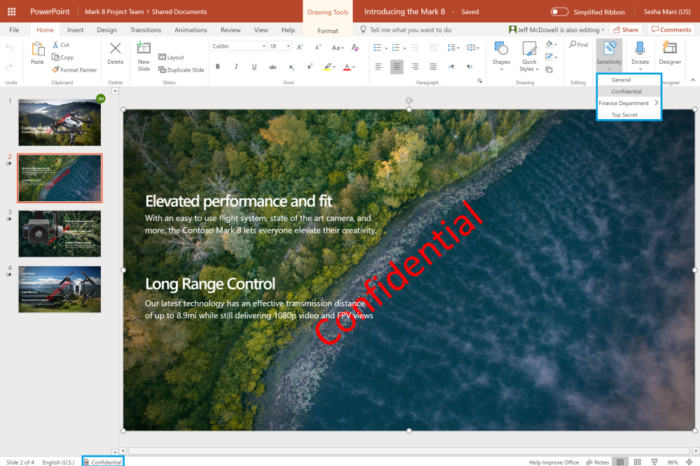
Sensitivity labels for SharePoint and OneDrive

Sensitivity labels from the Microsoft Information Protection framework let you classify and protect your organization’s data, while making sure that user productivity and their ability to collaborate is not hindered. When the sensitivity label are created and associate protection policies like encryption and visual marking, then your end users simply label their important documents and emails. You can find all the details in the Microsoft announcement.
SharePoint Term Store

The SharePoint Term Store is being updated and one of the changes is now visible. The user interface has been modified to look cleaner and is easier to use. When you want to create more terms you will need to switch to the classical view. You can do this by clicking on the link called Return to classic.

Teams: Tips and tricks

With so many people working from home the need to stay connected is stronger than ever. Meeting online is a bit different, but with a few tips and tricks you will almost forget that you are not in the same room.

Be inclusive and use your video

Turn on your camera if your internet connection allows it. Now people can not only hear you but also see your facial expressions.

  • You can turn on/off your video before you join a meeting.
  • Click on the slider next to the video icon.
  • You can also turn on/off the video during a meeting.
  • Click on the video button.

Blur your background

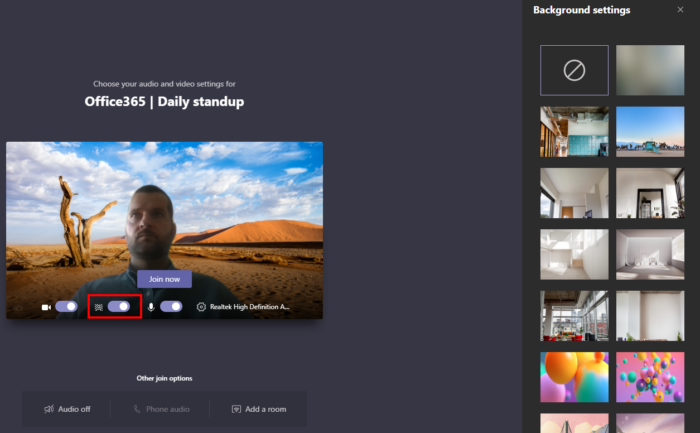
In formal meetings the general advice is to blur your background. This will create a more official setting. For informal meetings this is less important and it might even stir up interesting conversation or create a more relax atmosphere.

  • Just before you join a meeting, you can activate the blur option.
  • Turn on the blur option and select a background.
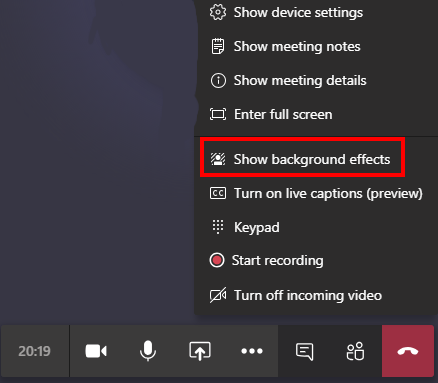
  • You can also activate the blur function during a meeting.
  • Click on the …
  • Then on Show background effects (blur).

Custom blurred backgrounds

It is possible to add your own backgrounds. Simply open the setting Show background effects and upload an image.

Mute your microphone

Mute your microphone when you are joining a larger meeting. Only activate you microphonewhen you want to speak. This way there will be less ambient noise and the meeting will proceede more fluid.

  • You can mute/unmute your microphone before you join a meeting.
  • Click on the slider next to the microphone icon.
  • You can also mute/unmute your microphone during a meeting.
  • Click on the microphone icon.

Sharing content

With teams you can share content from your computer. There are many options for sharing content. You can share the whole desktop or a specific window. My advice is to close all windows that you don’t want to share and then share the whole desktop. In most meetings you want to share multiple things and switching between sharing option generates unnecessary disturbances.

Teams across Mobile platforms

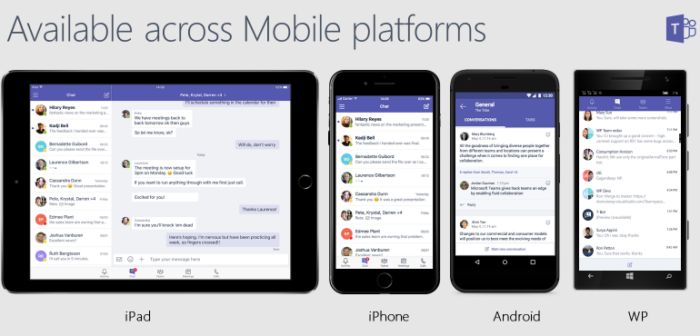
Teams is available on multiple mobile platforms. You can access your files and meetings any ware anytime. This means that you can also join a meeting while sitting in the garden or on the couch.

Flow: Button to launch a Flow/Automate from a view

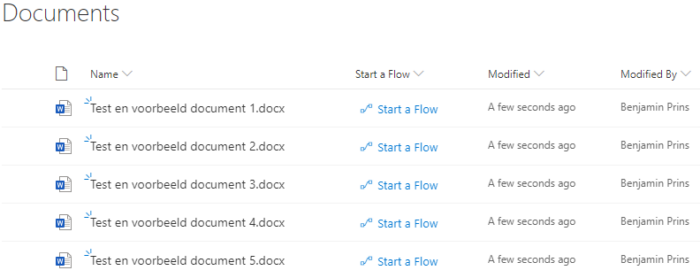
You can use column formatting (JSON) to create buttons that start a Flow on the corresponding list item in SharePoint. The button will be shown in the view for easy and fast access. After clicking the button the Flow Launch Panel will be displayed and you can start the Flow. This button is faster then clicking on the … then Flows followed by clicking the correct Flow.

Creating the button

  • Open the settings of the document library.
  • Create a new single line of text column with the name Start a Automate.
  • Go to a view where the new column is visible.
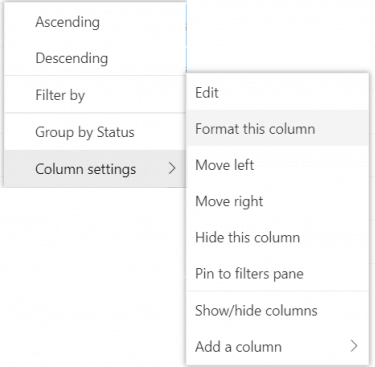
  • Open the menu of the column, click on Columns settings followed by Format this column.
  • If required click on the advanced mode option.
  • Copy and change the code below.
  • Change the txtContent to the name that needs to displayed as the value of the column. Currently it is Start the Automate.
  • Change the actionParams id to the Power Automate ID, see the steps below.
{
  "$schema": "https://developer.microsoft.com/json-schemas/sp/v2/column-formatting.schema.json",
  "elmType": "button",
  "customRowAction": {
    "action": "executeFlow",
    "actionParams": "{\"id\": \"788b1689-e999-99d9-9f37-fc539d5ba36b\"}"
  },
  "attributes": {
    "class": "ms-fontColor-themePrimary ms-fontColor-themeDarker--hover"
  },
  "style": {
    "border": "none",
    "background-color": "transparent",
    "cursor": "pointer"
  },
  "children": [
    {
      "elmType": "span",
      "attributes": {
        "iconName": "Flow"
      },
      "style": {
        "padding-right": "6px"
      }
    },
    {
      "elmType": "span",
      "txtContent": "Start the Automate"
    }
  ]
}
  • Add the JSON code and save the changes.
  • The button can only start Power Automate from the default environment.

Finding the Automate ID

  • Open Power Automate.
  • Click on the name of the Automate.
  • In the ID is located in the URL after shared.
  • For the following Flow URL the ID is 788b1689-e999-99d9-9f37-fc539d5ba36b
  • The button can only start Automates form the default environment.
https://emea.flow.microsoft.com/manage/environments/Default-40ce6286-0e4a-4500-8bb1-bf46447c5f7f/flows/shared/788b1689-e999-99d9-9f37-fc539d5ba36b/details

Flow and Twitter

The default Twitter web part it great and easy to use. You can follow a Twitter user (@), a URL of a user account, tweet or collection. These options where not enough for a communications department who wanted to show the #, @Company, the company name and from:[Company] on a SharePoint page. We were able to do this with a PowerAutomate Flow and a custom content query web part. In this post I will explain how you can do this.

SharePoint: Create a list

  • Create a SharePoint list to store the twitter information.
  • We created the following columns to store the information, your requirements might be different.
Column nameType
Favorite countsNumber
Followers countsNumber
LocationSingle line of text
Media urlsMultiple lines of text
Original tweetMultiple lines of text
Original tweet tweeted bySingle line of text
TweetMultiple lines of text
Tweeted bySingle line of text
Created atDate and time
TweetIdSingle line of text
Original tweet idSingle line of text
TypeChoice
RetweetsSingle line of text
ProfileImageUrlNumber
NameUserSingle line of text

Flow: Getting the information

  • Open PowerAutomate and create a new Flow.
  • Add the trigger When a new tweet appears.
  • Enter the required search term, see the example below.
  • We wanted to be able to filter on the different types of results, for example on # or @. This information is added to the item that will be created in the SharePoint list.
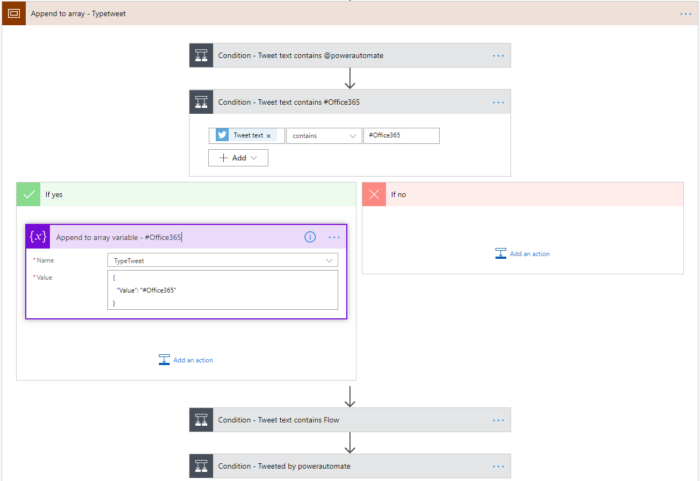
  • A tweet can be multiple types so we need an array and append all the types to it.
  • Initialize a variable called TypeTweet as an array.
  • Add a scope called Append to array – TypeTweet.
  • Add a condition that filters the #Office365 out of the TweetText.
  • If the result is yes then append the value #Office365 to the array.
  • Repeat the steps for all types of tweets.
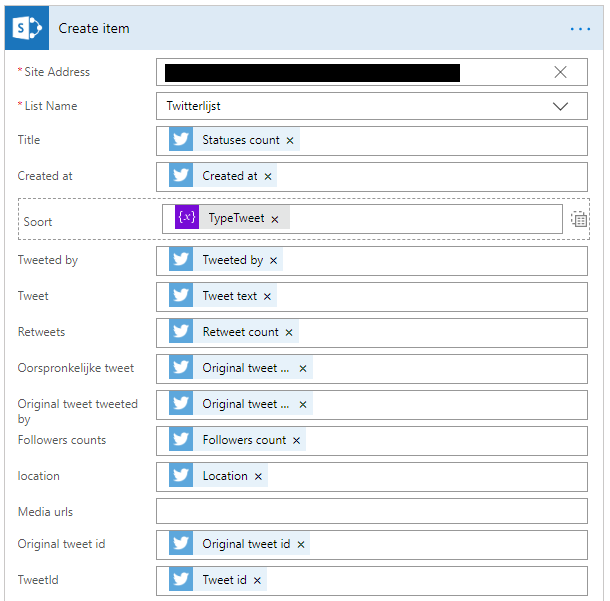
  • Add a scope called Create list item.
  • Add the SharePoint Create item action.
  • Connect all the columns to the correct information.

Custom Content Query Web part

We used a variation of the React Content Query Web Part from Github. This is a modern version of the CQWP where you have all the freedom to grab and style items from a list or library.

Flow: Tips and tricks

Microsoft Flow is a very powerful tool and can be used to do many different things. I think it has become my favorite tool in Office 365. Therefor I want to spread the Flow love and tell you a couple of tips and tricks when developing Flows.

Copy actions

A very useful and time saving capability within Micorosft Flow is that we can copy and paste actions. You can copy configured actions and reuse them! The best thing about this capability is that you can copy an action from one flow and past it into another. I often use this to copy the more complex HTTP request actions. This feature is currently in preview, but so far I have not encountered any issues with it.

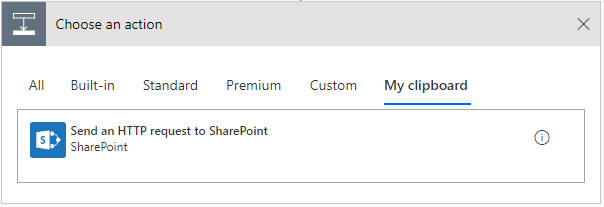
  • Click on the … on an action.
  • Click on Copy to my clipboard (preview).
  • Click on + New step.
  • Open the tab My clipboard.
  • Select the copied action.

Continue flow after a failed action

By default a flow will stop working if an action fails. If you know that an actions might fail occasionally you can setup a situation where only that action fails but not the whole flow. You can do with the Configure run after setting.

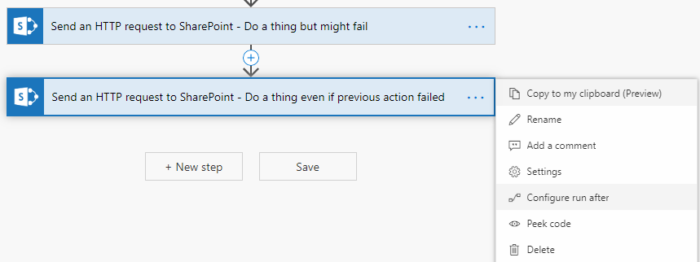
  • Click on the … of the action after the action that might fail.
  • Click on Configure run after.
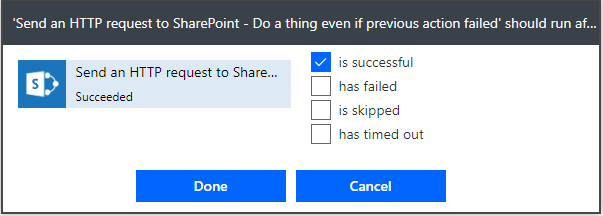
  • Here you can configure if the action will be run even if the previous failed, skipped or timed out.
  • In this example I selected both is successfull and has failed to.
  • The flow will now continue if the previous action failed or succeeded.

Scope try and catch

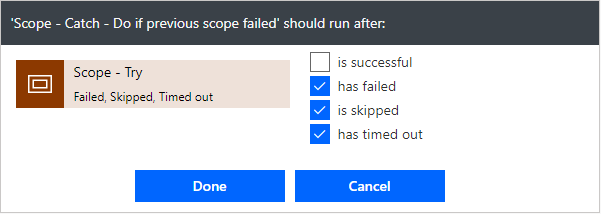
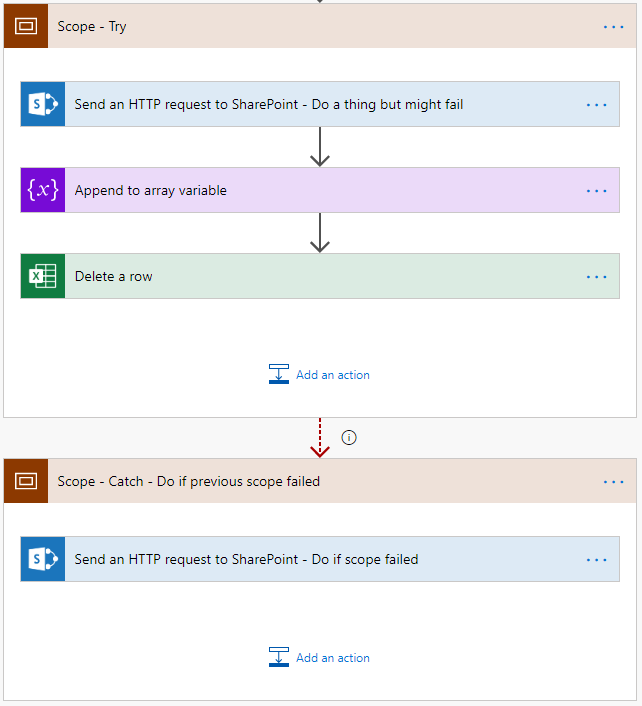
We can use the action scope to group actions to make the flow easier to read. There is however another great use for them. The scope action encapsulate a block of actions and inherit the last terminal status (Succeeded, Failed, Cancelled) of actions inside. This in combination with the Configure run after setting we can create a try and catch logic in our flows. In this example the second scope (catch) only runs if the first scope (Try) failed.

  • Create a scope with some actions
  • Create a second scope after the first scope
  • Set the Configure run after setting of the second scope to has failed, is skipped and has timed out.
  • In this scenario the catch scope will only run if the Try scoped faild.
  • The flow will look like this.

SharePoint Online: New features

Microsoft is working hard to update Office 365 by adding new features and improving the overall user experience. I am very excited for the following new features. Note that some of these features are already live, being rolled out or still being developed.

You will no longer need to post the same message in multiple channels! With this new feature you can create one message and post it to multiple channels.

Teams: Post in multiple channels

SharePoint: Customize search results

This feature is still in development but highly anticipated. I cannot wait to be able to create custom search results with the new experience.

SharePoint: Organization assets library

This feature is deployed and ready to be used. You can create a central location for organization wide assets. This will help every user to quick find the company logo and other assets.

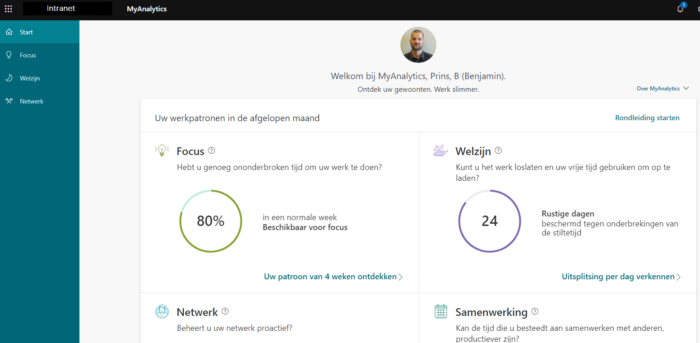
MyAnalytics

With MyAnalytics you can take a critical look at your Outlook and time usage. With these insights adjust you can adjust your planning to stay digitally fit.

Microsoft Search

The search experience will be extended, this means that where ever you are in Office 365 you will have access to a search bar. You’ll find the new Microsoft Search box at the top of several of the apps in Microsoft 365. It looks like this:

SharePoint: Drag and drop files to the canvas

It looks like a small change but it will make the live of content editors easier. We can now drag and drop files to the canvas (SharePoint page).

SharePoint: Quick edit

When in the quick edit mode you can do the following.

  • Reorder by dragging
  • Filtering
  • Adjust column width
  • People picker

SharePoint: Duplicate web parts

Another small but very helpful feature for content editors, we can now duplicate web parts!

SharePoint: undo and redo

The CTRL+Z & CTRL+Y has arrived, we can now undo and redo changes when editing pages!

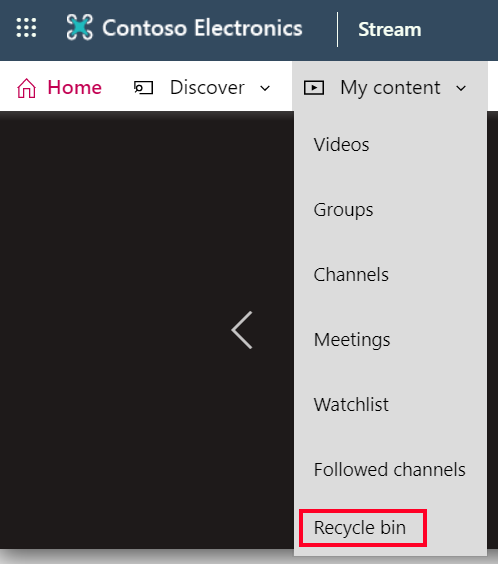
Stream: Recycle bin

A recycle bin has been added to Stream. When a video is deleted it will be placed in the recycle bin, after 30 days the video will be deleted permanently.

Mijn inhoud - recycle bin menu-item

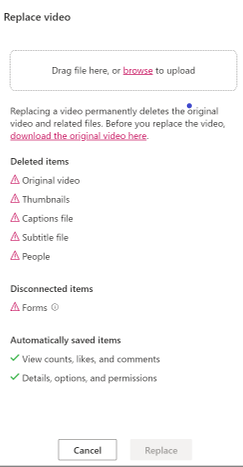
Stream: Replace video

Made a small change to a video and want to replace the old video? You now can replace it. This way the link and tags will remain the same.