Power Apps: Hidding and showing a component

I was tasked with developing a canvas app for a client that required each screen to include a popup element. The popup needs be openend by clicking an image, upon being clicked, it triggers a popup screen where users can compose a message. I utilized a Library Component and explored methods to control its visibility effectively. The challenge was ensuring that the message popup would appear when an image is clicked and disappear upon user interaction with a designated button. My solution involved manipulating the component’s dimensions — adjusting the height and width to expose only the image or to reveal the entire component. This technique successfully creates the perception of the popup screen being opened and closed by the user.

  • The first step is to create a solution with a canvas app and a component library.
  • In my example I named the component comp VIM Message.
  • Then open the component.
  • Set the size of the component to 640 by 640.
  • Add two custom output properties to the component named CompVIMHeigt and CompVIMWidth.
  • Set the component width to ‘comp VIM Message’.CompVIMWidth
  • Set the component height to ‘comp VIM Message’.CompVIMHeight
  • Set the component reset to Set(varCompHeight, 80);
  • Add an image element and set the following code on the Onselect. This will make the container visible and make the component bigger.
Set(varComVIMVisible, true);
Set(varCompHeight, 640);
Set(varCompWidth, 640);
  • You might need to adjust the numbers based on your needs.
  • Also set the X and Y properties on your image based on your needs. I use the following.
X = 'comp VIM Message'.Width - 55
Y = 15
  • Add a container with the element you need in the popup.
  • Set the following properties of the container.
Visible = varComVIMVisible
Height = 440
Width = 520
X = 75
Y = 190
Visible = varComVisible
  • Add two buttons in the container one called Cancel (in Dutch that would be Annuleren) and Send (in Dutch that would be Verzenden).
  • Set for both button the onselect to the following code, this will make the component smaller and hide the container.
Set(varCompHeight, 80);
Set(varCompWidth, 60);
Set(varComVIMVisible, false);
  • Open the canvas app and add the component comp CIM Message.
  • Insert the component into the canvas app.
  • Set the Heigth property to the following code. This will make sure the Height has a value when the canvas app page is loaded.
If(IsBlank('comp VIM Message_HS'.CompVIMHeight), 80, 'comp VIM Message_HS'.CompVIMHeight)
  • Set the Width property to the following code. This will make sure the Width has a value when the canvas app page is loaded.
If(IsBlank('comp VIM Message_HS'.CompVIMWidth), 60, 'comp VIM Message_HS'.CompVIMWidth)
  • Set the X property to the following code. This will make sure that the Image part of the component is on the left top side of the screen.
If('comp VIM Message_HS'.CompVIMWidth = 640, 'Home Screen'.Width - 640, 'Home Screen'.Width - 60)
  • Now run the canvas app and see if it works (it might not work in the play function in the edit mode).

From Bing Maps to Azure Maps

Bing maps has been an easy-to-use solution for getting location information in canvas apps, but this offering will be placed under the Azure Maps umbrella. While Bing Maps will continue to function for now, it’s essential to prepare for the transition. In this blog post I will explain how to use Azure Maps in a Canvas App. Please note that the locations shown in this post are not my actual location.

Azure Maps Services

  • First, we need to create a Azure Maps Account in a resource group (I will presume you know how to create a resource group).
  • Open your resource group.
  • Click on Create and search for and click on Azure Maps.
  • Click on Create.
  • Give the Azure Maps Account resource a name.
  • Select the correct Region and Pricing tier.
  • Agree with the terms and click on Review + Create.
  • Click on Create and wait for the deployment to be ready.
  • Click on Go to resource.
  • Click on Authentication and copy the Primary Key. You will need this in the Power Automate Flow.

The Power Automate Flow

  • Create a new Power Automate Flow and name it Azure maps get Postal Code.
  • Add as the trigger Power Apps (V2), with two text inputs called Longtitude and Latitude.
  • Next, we will add a HTTP action, this will call Azure Maps to get the location details based on the provided GPS location.
  • Set the method to Get.
  • Set the URI to the following code, make sure to put in your subscription-key (that is the primary key from the Azure Maps Account resource).
  • Set the Latitude and Longitude with the input fields form the trigger.
https://atlas.microsoft.com/search/address/reverse/json?api-version=1.0&subscription-key={YOUR KEY}&query={Latitude},{Longitude}
  • Add the action Parse JSON and give it the name Parse JSON – Location information.
  • Set the Content to the body of the HTTP call and set the schema as detailed in the linked file.
  • Add a compose action (if you want to only return the first found postal code).
  • The code for the input is as follows if you have named the Parse JSON action the same as I did.
first(body('Parse_JSON_-_Location_information')?['addresses'])?['address']?['postalCode']
  • Add the Respond to a Power App or flow action.
  • Add an output text called postalcode and add the compose as its value.
  • Your flow will now look like this.

The canvas app

We will now create the canvas app with a map that shows the user’s current location on a map, and a button to get the postal code of that location and a reset button. Please note this is not my actual location.

  • Create a new canvas app, I blank Phone canvas.
  • Click on Power Automate followed by Add flow to add the earlier created flow.
  • Add the map element to the canvas app.
  • Set the DefaultLatitude property with the following code.
Location.Latitude
  • Set the Location.Latitude property with the following code.
 Location.Longitude
  • Set DefaultLocation property with the following code.
true
  • If you want to see your Latitude and Logitude you can add labels to display the values.
  • Add a Label and set the Text property with the following code.
"Latitude: " & Location.Latitude
  • Add a Label and set the Text property with the following code.
"Longitude: " & Location.Longitude
  • Add a button and set the Text property with the following code.
"Get postal code"
  • Set following code on the OnSelect property. If needed update the code with your flow name, I used AzuremapsgetPostalCode.
Set(varPostalCode,AzuremapsgetPostalCode.Run(Location.Longitude, Location.Latitude));
  • Add a button and set the Text property with the following code.
"Reset"
  • Set following code on the OnSelect property.
Set(varPostalCode, Blank())
  • Add a label and set the Text property with the following code.
"Postal Code: " & varPostalCode.postalcode

Power Platform and Chat GPT

In today’s digital age, businesses are constantly looking for ways to streamline their processes and improve their customer experience. One way to do this is by leveraging the power of chatbots, which can quickly and efficiently answer customer inquiries. In this blog post, we will explore how to create a canvas app that uses Power Automate flow to ask ChatGPT API questions and display the response in the canvas app. By the end of this tutorial, you will have the tools and knowledge to build your own chatbot app that can answer your customers’ questions in real-time, enhancing their overall experience and increasing your operational efficiency. So, let’s get started!

Create a Chat GPT Api secret

  • Open the ChatGPT API site.
  • Login or create an account.
  • Click on Personal, followed by View API keys.
  • Click on Create new secret key and save the key in a password vault.

Creating the Power Automate Flow

  • Create a new Power Automate flow with the name Canvas app – Chat GPT.
  • Add as the trigger a PowerApps V2.
  • Add a text input with the name Question.
  • Add a HTTP action with the name Post to Chat GPT.
  • Set the Method to POST.
  • Set the URI to https://api.openai.com/v1/completions.
  • Set the header to Content-Type with value application/json.
  • Set a second header to Authorization with the value Bearer [API Secret].
  • Set the body to the following json code.
{
  "model": "text-davinci-003",
  "prompt": "triggerBody()['text']",
  "temperature": 0,
  "max_tokens": 4000
}
  • Add a Parse JSON action with the name Chat GPT Response.
  • Set the Content to Body (response of the HTTP call).
  • Set the following schema (update the schema is the response is different).
{
    "type": "object",
    "properties": {
        "id": {
            "type": "string"
        },
        "object": {
            "type": "string"
        },
        "created": {
            "type": "integer"
        },
        "model": {
            "type": "string"
        },
        "choices": {
            "type": "array",
            "items": {
                "type": "object",
                "properties": {
                    "text": {
                        "type": "string"
                    },
                    "index": {
                        "type": "integer"
                    },
                    "logprobs": {},
                    "finish_reason": {
                        "type": "string"
                    }
                },
                "required": [
                    "text",
                    "index",
                    "logprobs",
                    "finish_reason"
                ]
            }
        },
        "usage": {
            "type": "object",
            "properties": {
                "prompt_tokens": {
                    "type": "integer"
                },
                "completion_tokens": {
                    "type": "integer"
                },
                "total_tokens": {
                    "type": "integer"
                }
            }
        }
    }
}
  • Add the Respond to a PowerApp or Flow action.
  • Add a text output called ChatGPTRepsonse and add the response from Chat GPT with the following code.
first(body('HTTP_-_Post_to_Chat_GPT')?['choices'])?['text']
  • The overall Power Automate flow will look like this.

Creating the Canvas app

  • Open the Power Apps Studio and create a new canvas app.
  • Rename Screen1 to Home.
  • Add the Canvas app – Chat GPT Power Automate flow to the canvas app.
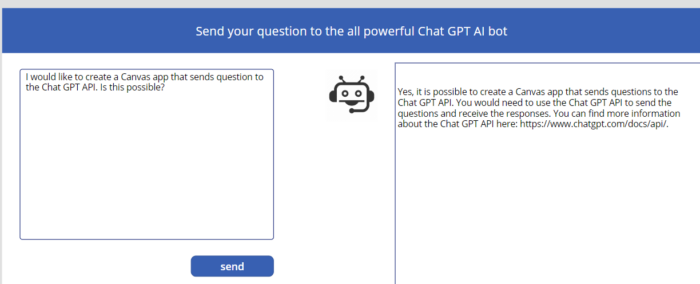
  • Add a Rectange Shape to the top of the canvas app with the name RectTitle.
  • Add a label over the RectTitle with the name lblChatGPT.
  • Set the Text to “Send your question to the all powerful Chat GPT AI bot”.
  • Add a label with the name lblGPTRepsonse.
  • Place the lblGPTRepsonse on the right side of the screen.
  • Add a text input with the name txtQuestion.
  • Place the txtQuestion on the left side of the screen.
  • Set the txtQuestion Default to “What is your question?”.
  • If you like add an Image with the name imgRobot and add an image of a robot in the Image property.
  • Place the imgRobot left and next to the lblGPTRepsonse.
  • Add a button with the name btnSendQuestion.
  • Set the following code on the Onselect of the btnSendQuestion.
    • This will save the response in the variable repsonsegpt.
    • Start the flow with the text provided in the textQuestion text input box.
Set(responsegpt, 'Canvasapp-ChatGPT'.Run(txtQuestion.Text).chatgptrespondse)

Create and delete B2C accounts for Dataverse Contact

Today, we’ll be discussing a crucial aspect of B2C account management – the creation and deletion of B2C accounts in response to changes in the Dataverse Contact. This is an important topic for businesses that deal with external Power Pages user (contacts) that want to ensure the security of their records and Power Pages. In this post I will explain how to create or delete B2C accounts that are connected to a Dataverse Contact. So, let’s dive in!

Create a B2C account when a Dataverse Contact is created

Whenever a new contact is created a new B2C account needs to be created automatically that is linked to the contact. This is done thought the email address of the contact and the Azure B2C account id. These automations will limit the amount of manual admin work.

  • Create a new Power Automate flow with the name Create B2C user for Dataverse Contact.
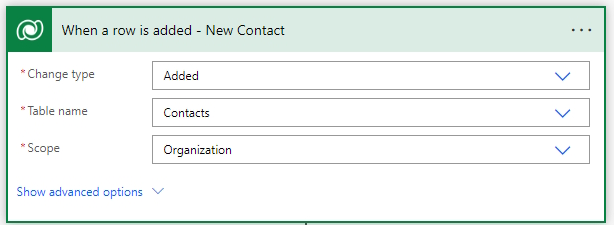
  • Add the Dataverse trigger When a row is added.
  • Set the Change type to Added.
  • Set the Table name to Contacts.
  • Set the Scope to Organization.
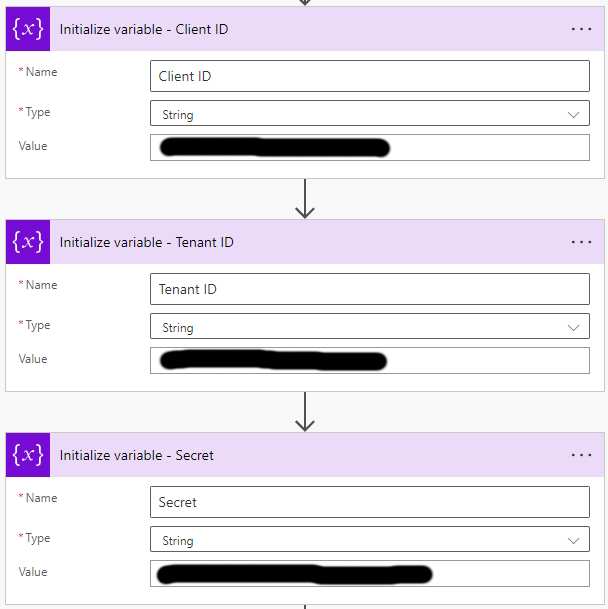
  • Create the following 3 variables.
  • You will need to create an Application Registration in the B2C tenant with the following permissions.
Permission typePermissions (from least to most privileged)
Delegated (work or school account)User.ReadWrite.All, Directory.ReadWrite.All
Delegated (personal Microsoft account)
Not supported
ApplicationUser.ReadWrite.All, Directory.ReadWrite.All
  • Store the Client ID, Tenant ID and Secrect in the corresponding variables.
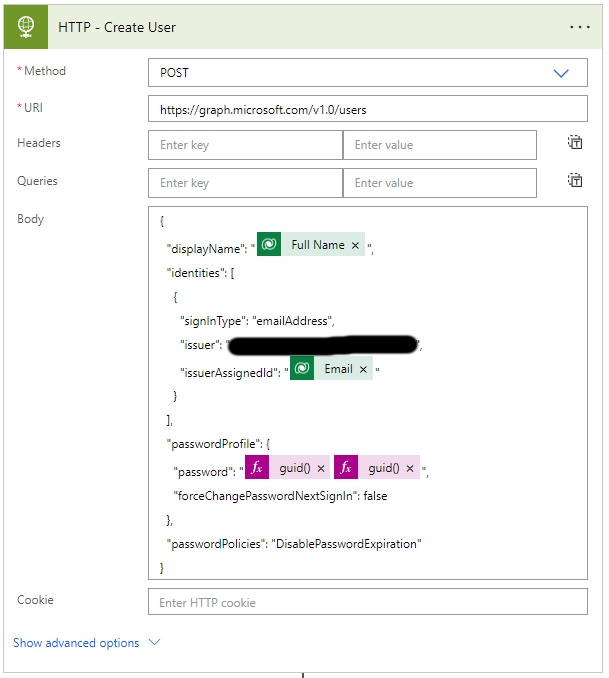
  • Add a HTTP action called HTTP – Delete User to the flow.
  • Set the Method to: Post.
  • Set the URI to the following code.
https://graph.microsoft.com/v1.0/users
  • Set the body to the following code.
  • In my scenario the user will not be using the password but the one-time password from B2C. That’s why I have added a guid twice as the password.
  • This call will create an account of the type email address which allows for any valid email to be used. The email does not have to be part of the B2C domain.
  • Parse the JSON response of the HTTP – Create User call.
  • Add the Dataverse action Update a row.
  • Set the Table name to Contact.
  • Set the Row id to the contact id of the trigger.
  • Add the id that was returned by the HTTP call that created the B2C account.
  • Save the flow.

Delete B2C account when Dataverse Contact is deleted

In my scenario I am maintaining the Power Pages contacts within a canvas app, and when a contact is deleted the associated B2C account needs to be deleted too.

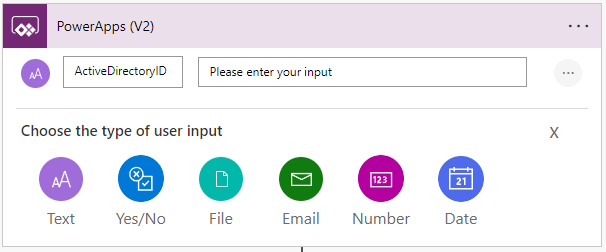
  • Create a new Power Automate flow with a Power Apps (V2) trigger with the name Delete B2C users for deleted Dataverse Contact.
  • Add an input Text field names ActiveDirectoryID.
    • This is the Object ID of the Azure B2C Active Directory User connected to the Contact.
  • Create the following 3 variables.
  • You will need to create an Application Registration in the B2C tenant with the following permissions.
Permission typePermissions (from least to most privileged)
Delegated (work or school account)User.ReadWrite.All
Delegated (personal Microsoft account)
Not supported
ApplicationUser.ReadWrite.All
  • Store the Client ID, Tenant ID and Secret in the corresponding variables.
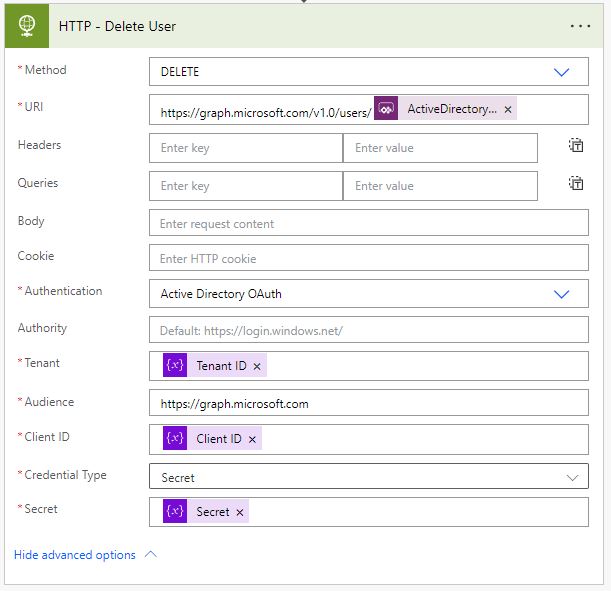
  • Add a HTTP action called HTTP – Delete User to the flow.
  • Set the Method to: Delete.
  • Set the URI to the following code.
https://graph.microsoft.com/v1.0/users/
  • Add the PowerApp (V2) parameter ActiveDirectoryID to the end of the URI.
  • Set the Tenant, Client ID and Secret fields with their corresponding variables.
  • Set the Authentication to Active Directory OAuth.
  • Set the Audience to the following code.
https://graph.microsoft.com
  • Save the Power Automate Flow.
  • Open or create a canvas app (Power Apps).
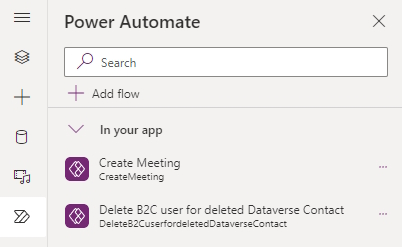
  • Open the Power Automate panel in the canvas app.
  • Add the Delete B2C users for deleted Dataverse Contact Power Automate flow.
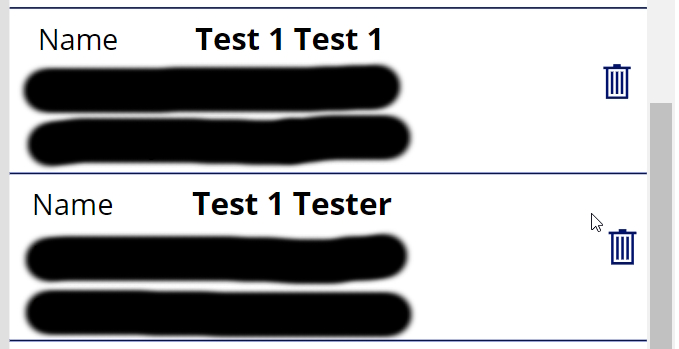
  • Add a gallery with the source set to the Dataverse Contact table.
  • Add a recycle bin or other delete Icon to the gallery.
  • Add the following code to the recycle bin icon under OnSelect.
    • This will remove the contact record.
    • Starts the Power Automate Flow and sending the User Name (Users B2C object ID).
    • Notifies the users.
Remove(Contacts, ThisItem);
DeleteB2CuserfordeletedDataverseContact.Run(ThisItem.'User Name');
Notify("Record deleted successfully", NotificationType.Success);
  • Save and publish the canvas app.

Conditional access device filtering for canvas apps

Conditional access policies for individual Power Apps will be general available in September 2022 (currently in public preview) and will give us a lot of control on how users can access Power Apps. With the use of Azure Active Directory Conditional Access, we can add extra layers of security to individual Power Apps to contain sensitive data. In my project we needed to create a conditional access policy to prevent a canvass app being opened on any mobile device. With Conditional access policies for individual Power Apps we were able to do this.

Setting up conditional access

First we need to setup the conditional access policies in Azure Active Directory and connect it to an authentication context.

  • Select the authentication context created earlier.
  • Create the conditions and select all device platforms besides windows.
  • Select the Block access under Grant to block all the device platforms besides windows.
  • Click on Save.
  • The policy is now created, but still needs to be connected to the canvas app.

Connect the conditional access to the canvass app

The policy needs to be connected to the canvas app with PowerShell.

  • Open PowerShell as an administrator.
  • Connect PowerShell to the Power Platform with the following command.
Add-PowerAppsAccount
  • The PowerShell command requires the EnvironmentName (ID of the environment), AppName (ID of the canvass app) and the ID of the authentication context. The ID’s in my example are changed for security reasons.
Set-AdminPowerAppConditionalAccessAuthenticationContextIds -EnvironmentName Default-44444444-2222-3338-9b7f-0771d0c3301c -AppName b0111111-5555-4444-a22a-5af2574f1ed7 -AuthenticationContextIds c2
  • The conditional access policy is now connected to the canvas app.

Embed a canvas app in a model-driven app

Did you know that you can embed (add) a canvas app in a model-driven app? With the embedded canvas app, you can fully use the power of the canvas app inside a model-driven app. In my project I used it to provide the user with the capability to search an Oracle database and select a specific company.

It is very easy to add a canvas app, but I recommend to use it only when no other options are viable. The reason for this is that the embedded canvas app needs to be reconnected every time you transfer the solution form one environment to another.

Embed the canvas app

  • Create / add a canvas app in the same environment as the model-driven app.
  • Open the form of the entity where the canvas app needs to be embedded.
  • Click on +Component and select the Canvas app.
  • Fill in the App ID Static value with the unique ID of the canvas app and click on Done.
  • You can find the App ID by right clicking on an app and clicking on Details.

Solution deployments

The canvas app is now part of the model-driven app and needs to be in the same solution. When you transfer the solution from the development environment to the test environment, you will need to update the model-driven form manually. The reason for this is that the model-driven app is still connected to the canvas app on development. You will need to change the reference / GUID to the canvass app on production. And do not forget to share the canvas app with the users.