Power Automate: Start a Flow from a column change

With Microsoft Power Automate we can now create flows that start based on specific columns being updated in SharePoint!  This is a feature I have been waiting on for years! The action is called Get changes for an item or a file. The action returns a boolean for each field, whether it was just changed or not. Based on this boolean you know if a field was changed.

Creating the flow

  • Create a SharePoint list, I created the following project list.
  • Enable versioning on the list.
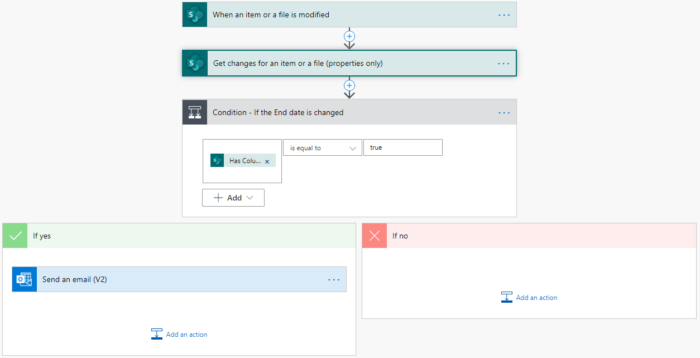
  • Create a flow and use the trigger When an item or a file is modified.
  • Select your site and list.
  • Add the action Get changes for an item or a file (properties only).
  • Fill in the site address, library name and the ID of the item that was triggered.
  • The field Since is used to get the changes we need to make a comparison. If you use 1.0 you will compare the current item version with version 1.0. But we want the latest changes so we use the following expression.
sub(int(triggerOutputs()?['body/{VersionNumber}']),1)
  • I want to send an email when the end date of a project changes.
  • Add the action Conditions to check if the end date was changed.
  • Add the dynamic content Has Column Changed: End date.
    This returns a boolean value.
  • Put the required actions in the If yes section after the condition.
    In my example I am sending an email.
  • Add the action Send an email (V2) and fill in as follows.
Power Automate: Creating and updating a document set in SharePoint

Many colleagues have asked me how to create or update document sets with Power Automate. I had never done this before so I told them to use a web service. From now on, I can point them to this blog post. The flow is created with the help of my colleague Jasper Voskuilen, because this web service is a bit more complicated to setup.

Creating the flow

  • Open Power Automate and create a new flow (automation).
  • I created a flow with the trigger, for a selected item.
  • In my situation I get all items from a list and then create a document set for each result.
  • Create the following variables with the related values.
  • This will make the flow more dynamic for later changes.
  • SiteURL as a string, fill in the Site URL.
  • ContentType as a string, fill in the content type id.
  • URLLibrary as a string, fill in the library name part of the ULR.
    For this example it is: Library
https://domein.sharepoint.com/sites/ExampleSite/Library/Forms/allitems.aspx
  • TitleLibrary as a string, fill in the title (name) of the library.
  • WebServiceURLBibliotheek as a string, fill in the Library URL used by the web service.
  • You can find the web service url by using the following URL
https://domein.sharepoint.com/sites/ExampleSite/_vti_bin/listdata.svc/
  • Add the action Send an HTTP request to SharePoint
  • Use the varibles to configure the web service.
  • The name of the document set needs to be unique. I used a value from my list item, your situation might be different.
  • If required you can update the newly created document set.
  • Add the action Parse JSON and parse the Body of the Create Document set HTTP request.
  • Add the action Send an HTTP request to SharePoint
  • Use the variables to configure the web service.
  • The properties you need to set might be different than mine. I used values from my list item but your situation might be different.

Flow: Button to launch a Flow/Automate from a view

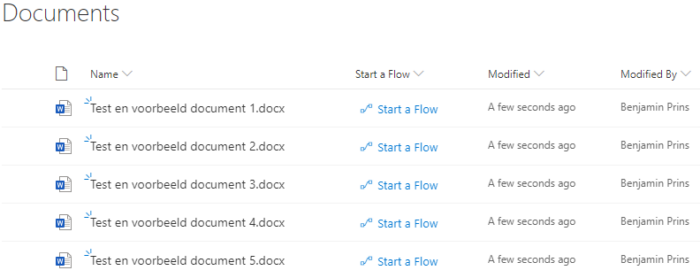
You can use column formatting (JSON) to create buttons that start a Flow on the corresponding list item in SharePoint. The button will be shown in the view for easy and fast access. After clicking the button the Flow Launch Panel will be displayed and you can start the Flow. This button is faster then clicking on the … then Flows followed by clicking the correct Flow.

Creating the button

  • Open the settings of the document library.
  • Create a new single line of text column with the name Start a Automate.
  • Go to a view where the new column is visible.
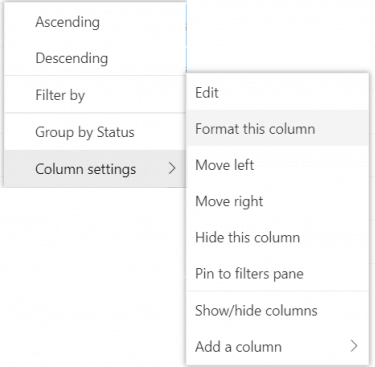
  • Open the menu of the column, click on Columns settings followed by Format this column.
  • If required click on the advanced mode option.
  • Copy and change the code below.
  • Change the txtContent to the name that needs to displayed as the value of the column. Currently it is Start the Automate.
  • Change the actionParams id to the Power Automate ID, see the steps below.
{
  "$schema": "https://developer.microsoft.com/json-schemas/sp/v2/column-formatting.schema.json",
  "elmType": "button",
  "customRowAction": {
    "action": "executeFlow",
    "actionParams": "{\"id\": \"788b1689-e999-99d9-9f37-fc539d5ba36b\"}"
  },
  "attributes": {
    "class": "ms-fontColor-themePrimary ms-fontColor-themeDarker--hover"
  },
  "style": {
    "border": "none",
    "background-color": "transparent",
    "cursor": "pointer"
  },
  "children": [
    {
      "elmType": "span",
      "attributes": {
        "iconName": "Flow"
      },
      "style": {
        "padding-right": "6px"
      }
    },
    {
      "elmType": "span",
      "txtContent": "Start the Automate"
    }
  ]
}
  • Add the JSON code and save the changes.
  • The button can only start Power Automate from the default environment.

Finding the Automate ID

  • Open Power Automate.
  • Click on the name of the Automate.
  • In the ID is located in the URL after shared.
  • For the following Flow URL the ID is 788b1689-e999-99d9-9f37-fc539d5ba36b
  • The button can only start Automates form the default environment.
https://emea.flow.microsoft.com/manage/environments/Default-40ce6286-0e4a-4500-8bb1-bf46447c5f7f/flows/shared/788b1689-e999-99d9-9f37-fc539d5ba36b/details