SharePoint: Show all files which have no checked in version

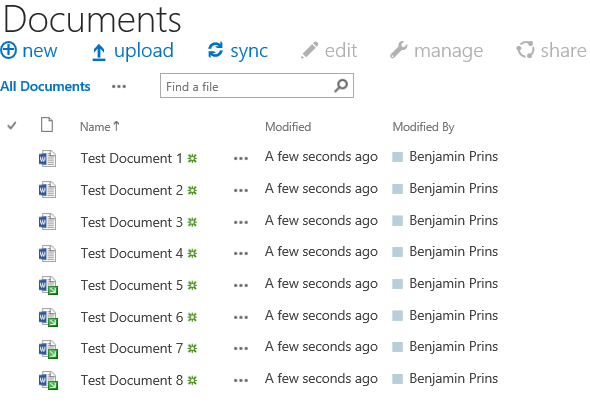
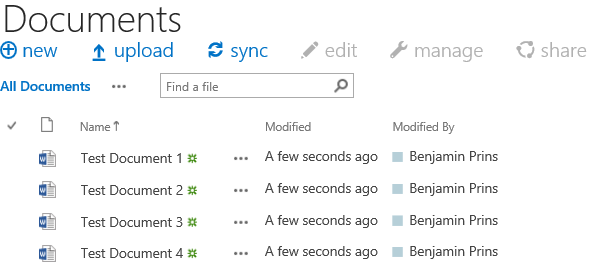
With SharePoint 2010/2013 and the “Check in – Check out” feature enabled documents may seem to disappear and reappear for users without a cause. A common scenario is that colleague 1 saved a document on SharePoint but colleague 2 is unable to find it. While Colleague 1 can still see and find the document. This is a common and a very frustrating situation. This happens when a new file is stored on SharePoint but does not yet have a checked in version. This can happen when multiple files are uploaded to SharePoint and a required column is not filled in or when the setting Require Check Out is enabled. The file(s) will be stored on SharePoint but will be check out and only visible for the up-loader. There is a way for every user to see these hidden checked out documents.

Colleague 1 sees Colleague 2 sees
All documents Check in documents

 
Solution

1. Open the document library where the documents are missing.
2. Click in the ribbon on Library – Settings – Library Settings.
3. Click on Manage files which have no checked in version.
4. All the documents without a checked in version will be displayed.
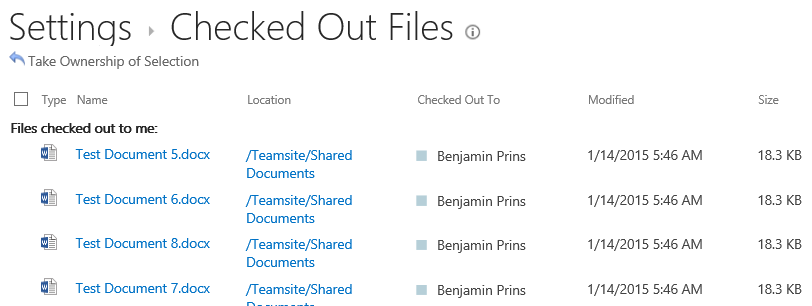
Checked Out Files
5. If needed the user can take over the ownership and check in the document.
SharePoint 2013: Folders are bad

You have probably heard this SharePoint slogan before: Do not use folders with SharePoint. If you are wondering why this is or need some arguments to convince a customer, then use the following list of reasons.

1. Structure
Changing a folder structure is complicated and time consuming, while changing a metadata structure is easier.

2. Authorization
Setting authorization on folders is possible but before you know it you have created an administrative nightmare

3. Findability
A nested folder structure is only know to the person who created it. Nesting folders will result in semi hidden files.

4. URL length
The URL Length is limited around 256 characters. All the nested folders names will be added to the URL which means you will run into the 256 limit very fast.

5. File Path
When moving files between folders will change the files path. This can result in broken links to the moved file.

6. Duplication
Multiple copies of one file tend to end up in multiple folders. This will result in version conflicts and possible misinformation.

7. Navigation: The user experience with navigating through folders is time consuming and confusing. It is hard to remember where you are and which folders you already checked.

8. Navigation
When a few sub folders down it is very hard to see where you are in the folder structure

9. Filter
You are able to filter within the opened folder, you are unable to filter all the document simultaneously. Filtering all documents simultaneously will speed up the searching process.

10. Sorting
You are able to sort within the opened folder, you are unable to sort all the document simultaneously. Sorting all documents simultaneously will speed up the searching process.

11. Losing files
When you place a file in a wrong folder in a lot of situation you know lost a file.

12. Forcing groups
Files can fall under multiple groups, with folders you need to store the file twice.

SharePoint Custom Grouping with XSLT

For SharePoint solution where the look and feel or clean code is very important we often create custom header.xslt ContentQueryMain.xslt and ItemStyle.xstl files. The files are almost completely empty to provide us with maximal control. This also means we need to recreate functionality that normally works by default. A good example is the ability to group the results.

Solution
1. Create the custom XSLT files and link the files to the Content Query Web Part.
2. The following code is a complete example of a custom Content Query Main XSLT file. This code generates grouping.

<xsl:stylesheet
    version="1.0"
    exclude-result-prefixes="x xsl cmswrt cbq" 
    xmlns:x="http://www.w3.org/2001/XMLSchema"
    xmlns:xsl="http://www.w3.org/1999/XSL/Transform"
    xmlns:cmswrt="http://schemas.microsoft.com/WebPart/v3/Publishing/runtime"
    xmlns:cbq="urn:schemas-microsoft-com:ContentByQueryWebPart">
    <xsl:output method="xml" indent="no" media-type="text/html" omit-xml-declaration="yes"/>

  <xsl:key name="Grouping" match="Row" use="@GroupingColumn" />

  <xsl:template match="/">
 <xsl:for-each select="/dsQueryResponse/Rows/Row[generate-id(.)=generate-id(key('Grouping',@GroupingColumn))]/@GroupingColumn">
  <xsl:sort />
        <xsl:value-of select="."/>
        <xsl:for-each select="key('Grouping', .)">
         <br /><xsl:value-of select="@Title" />
         </xsl:for-each>
        <br/>
      </xsl:for-each>     
    </xsl:template>
</xsl:stylesheet>

3. Change the XSLT where needed

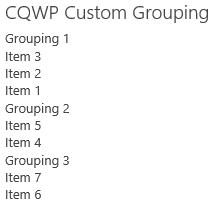
Result
CQWP Custom Grouping

Show Pictures with Slimbox in SharePoint

Pictures are an important part of a SharePoint site, it enriched the otherwise plain look and feel. With a little extra effort we can integrate Slimbox to show the pictures in a very slick and modern way.

Solution

1. Download Slimbox2 and jQuery, in this example I used jQuery 1.8.3 uncompressed.
2. Save the files in the Style Library of SharePoint. Note that not all the Slimbox files are required to be stored in SharePoint.
3. Include the jQuery javascript, the Slimbox javascript and the Slimbox CSS to the page, page-layout or the master page.

<script type="text/javascript" src="js/jquery.js"></script>
<script type="text/javascript" src="js/slimbox2.js"></script>
<link rel="stylesheet" href="css/slimbox2-rtl.css" type="text/css" media="screen" />

5. Create a picture library and save a couple of pictures to the library. The picture library will provide the necessary thumbnails without any extra effort.
6. Add a CQWP to a page and query the pictures.
7. Create a XSLT that shows the small thumbnails of the pictures, for example in a banner view.

Slimbox Result 1

8. I created two variables for the default SharePoint Thumbnails, Thumbnail_w and Thumnbail_t. And used the following code to show the small thumbnail with a Slimbox link to the bigger thumbnail.

<a href="{$Thumbnail_w}" rel="lightbox" title="{@Title}">
   <img src="{$Thumbnail_t}" alt="alt" class="PhotoAppThumbnail" />
</a>

9. Also note that the title field is added to the Slimbox link, the title will be displayed on the Slimbox overlay.

Result

Slimbox Result 1

SharePoint Designer: Clearing the cache

SharePoint Designer sometimes is out of sync with SharePoint. SharePoint Designer will incorrectly show items as checked out (or checked in) and refuses to be update with the actual status. In some cases the following error will be shown when trying to check out/in an item.

“Cannot perform this operation. The file is no longer checked out or has been deleted.”

Solution
The solution to this problem is to clear the cache of SharePoint Designer.

1. If opened close SharePoint Designer
2. Open the folder %APPDATA%MicrosoftWeb Server ExtensionsCache
3. Delete the contents
4. Open the folder %USERPROFILE%AppDataLocalMicrosoftWebsiteCache
5. Delete the contents
6. Problem solved.