SharePoint 2013 Workflow: Changing Permissions with REST Calls

SharePoint 2013 workflows do not have a default action to change item or list permissions. With the help of the call http web service action I was able to create multiple REST calls that can interact with the permission. In this blog post describes multiple workflows for specific interactions involving permissions. The solutions where build on SharePoint Online (Office 365) using SharePoint 2013 workflows.

Breaking the inheritance on current item

This workflow will break the inheritance of the item the workflow is running on. It is possible to change the regURL to break the inheritance of different items. If needed set the actions within an App step to make sure the workflow has the required permissions, see the blog post SharePoint 2013 Workflow: App step and App Permissions.

  1. Create a SharePoint 2013 workflow
  2. Create a dictionary variable called JSONRequestHeader
  3. Create a string variable called regURL
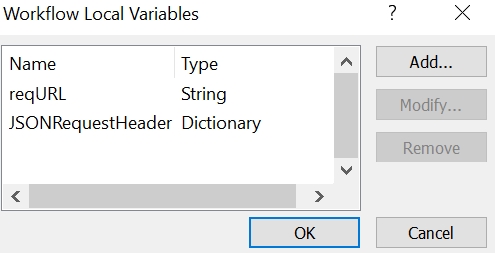
  4. Add the action Build Directory, select JSONRequestHeader as the variable
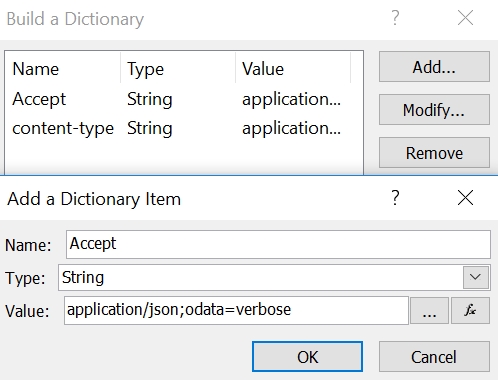
  5. Add Accept and content-type to the directory with the following code:
    application/json;odata=verbose
    

  6. Then store the following URL to the variable regURL

    [%Workflow Context:Current Site URL%]_api/lists/getbytitle('[%Worklfow Context:List Name%]')/items([%CurrentItem:ID%])/breakroleinheritance(true)
    

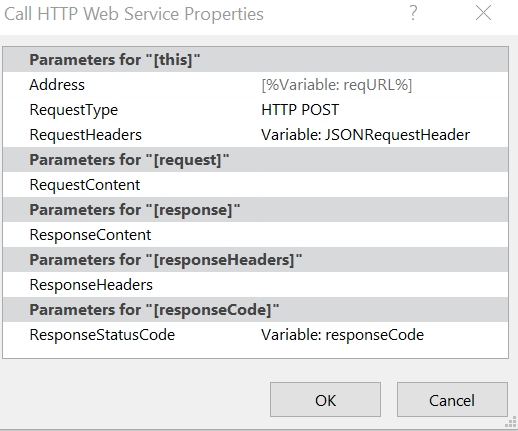
  7. Add the Call HTTP web service action to the workflow and set the “this” to the regURL
  8. Set RequestHeaders to Variable: JSONRequestHeader
  9. Set RequestType to HTTP Post
  10. The full workflow looks like this

Set permissions on current item

This workflow will set permissions on the item the workflow is running on. It is possible to change the regURL to set permission on different items. If needed set the actions within an App step to make sure the workflow has the required permissions, see the blog post SharePoint 2013 Workflow: App step and App Permissions.

  1. Create a SharePoint 2013 workflow
  2. Create a dictionary variable called JSONRequestHeader
  3. Create a string variable called regURL
  4. Add the action Build dictionary, select JSONRequestHeader as the variable
  5. Add Accept and content-type to the directory with the following code:
    application/json;odata=verbose
    

  6. In this example we will grant the default members group contribute permissions.
  7. Add an step in the workflow called: Set Role Members
  8. Then store the following URL to the variable regURL
    [%Workflow Context:Current Site URL%]_api/lists/getbytitle('[%Worklfow Context:List Name%]')/items([%CurrentItem:ID%])/roleassignments/addroleassignment(principalid='769',roleDefId=1073741826)
    
  9. The roleDefID sets the type off permissions
  10. The principalId is the ID of the permissions group, this is an unique id. You will need to find the principalId for your SharePoint Group, see the chapter Get SharePoint Groups principalId to learn how to find the principalId.
  11. Add the Call HTTP web service action to the workflow and set the “this” to the regURL
  12. Set RequestHeaders to Variable: JSONRequestHeader
  13. Set RequestType to HTTP Post
  14. The full workflow looks like this

Get SharePoint Groups principalId

  1. Open the SharePoint site where the SharePoint Groups are present
  2. Create the following URL
    [Current Site URL]/_api/lists/getbytitle('[List Name]')/items([Item ID])/roleassignments/
    
  3. In the source of the page you can find the principalId’s
  4. The principalId’s are located between the following tag
    <d:PrincipalId m:type="Edm.Int32">769</d:PrincipalId>

Remove all permissions on current item

This workflow will remove all permissions on the item the workflow is running on. It is possible to change the regURL to remove all permission on different items. If needed set the actions within an App step to make sure the workflow has the required permissions, see the blog post SharePoint 2013 Workflow: App step and App Permissions. With this workflow we will first break the inheritance, then get all permissions/roles on the item and then remove the roles. Only site collection administrator and farm admins will be able to access the item when the workflow has run.

  1. Create a SharePoint 2013 workflow
  2. Create a dictionary variable called JSONRequestHeader
  3. Create a dictionary variable called JSONDeleteHeader
  4. Create a dictionary variable called JSONResponse
  5. Create a dictionary called AllRoles
  6. Create a dictionary called RoleItem
  7. Create a string variable called regURL
  8. Create a integer called principalId
  9. Create a integer called Index
  10. Create a integer called countRoles
  11. Create a number called calc
  12. Add the action Build Dictionary, select JSONRequestHeader as the variable
  13. Add Accept and content-type to the directory with the following code:
    application/json;odata=verbose
    

  14. Add the action Build Dictionary, select JSONDeleteHeader as the variable
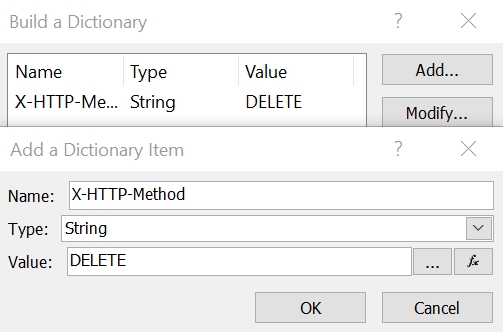
  15. Add X-HTTP-Method to the directory with the following code:
    DELETE
    

  16. The first step is to break the inheritance of the items, see above the chapter breaking the inheritance on current item for the steps.
  17. The second step is to get all SharePoint Groups (Roles) that have permissions on the item.
  18. Store the following URL to the variable regURL
    [%Workflow Context:Current Site URL%]_api/lists/getbytitle('[%Worklfow Context:List Name%]')/items([%CurrentItem:ID%])/roleassignments
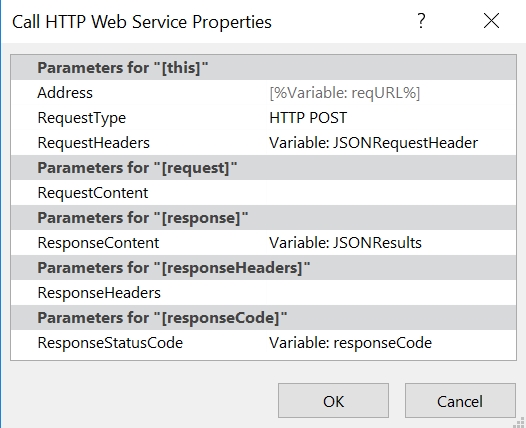
  19. Add the Call HTTP web service to the workflow and set the “this” to the regURL
  20. Set RequestHeaders to Variable: JSONRequestHeader
  21. Set RequestType to HTTP Post
  22. Set ResponseContent to JSONResults
  23. Add the action Get an Item from a Dictionary, select from Variable: JSONResults, with output to Variable:AllRoles and the following code
    d/results

  24. Then add the action Count Items in a Dictionary, select from Variable:AllRoles with output Variable: countRoles
  25. The third step is to remove all the Roles
  26. Add a loop that runs repeatedly while: Variable:Index is less then Variable:countRoles
  27. Add the action Get an Item from a Dictionary, select from Variable: JSONResults, with output to Variable:roleItems and the following code
    d/results([%Variable:Index%])
  28. Add the action Get an Item from a Dictionary, select from Variable: roleItem, with output to Variable:principalId and the following code
    PrincipalId

  29. Then store the following URL to the variable regURL
    [%Workflow Context:Current Site URL%]_api/lists/getbytitle('[%Worklfow Context:List Name%]')/items([%CurrentItem:ID%])/roleassignments([%Variable:principalId%])
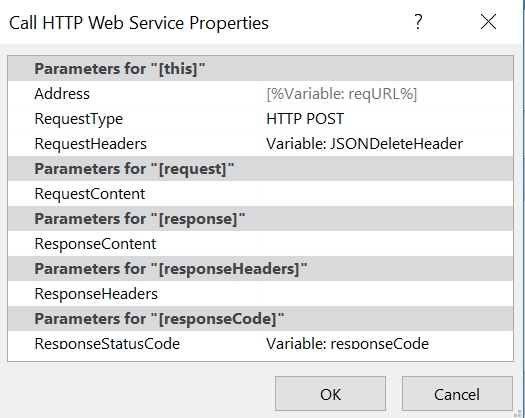
  30. Add the Call HTTP web service to the workflow and set the “this” to the regURL
  31. Set RequestHeaders to Variable: JSONDeletedHeader
  32. Set RequestType to HTTP Post
  33. Add the action Do Calculation select Variable:Index plus 1 and store the outcome in Variable: Calc
  34. Then Set Variable:Index to Variable:Calc
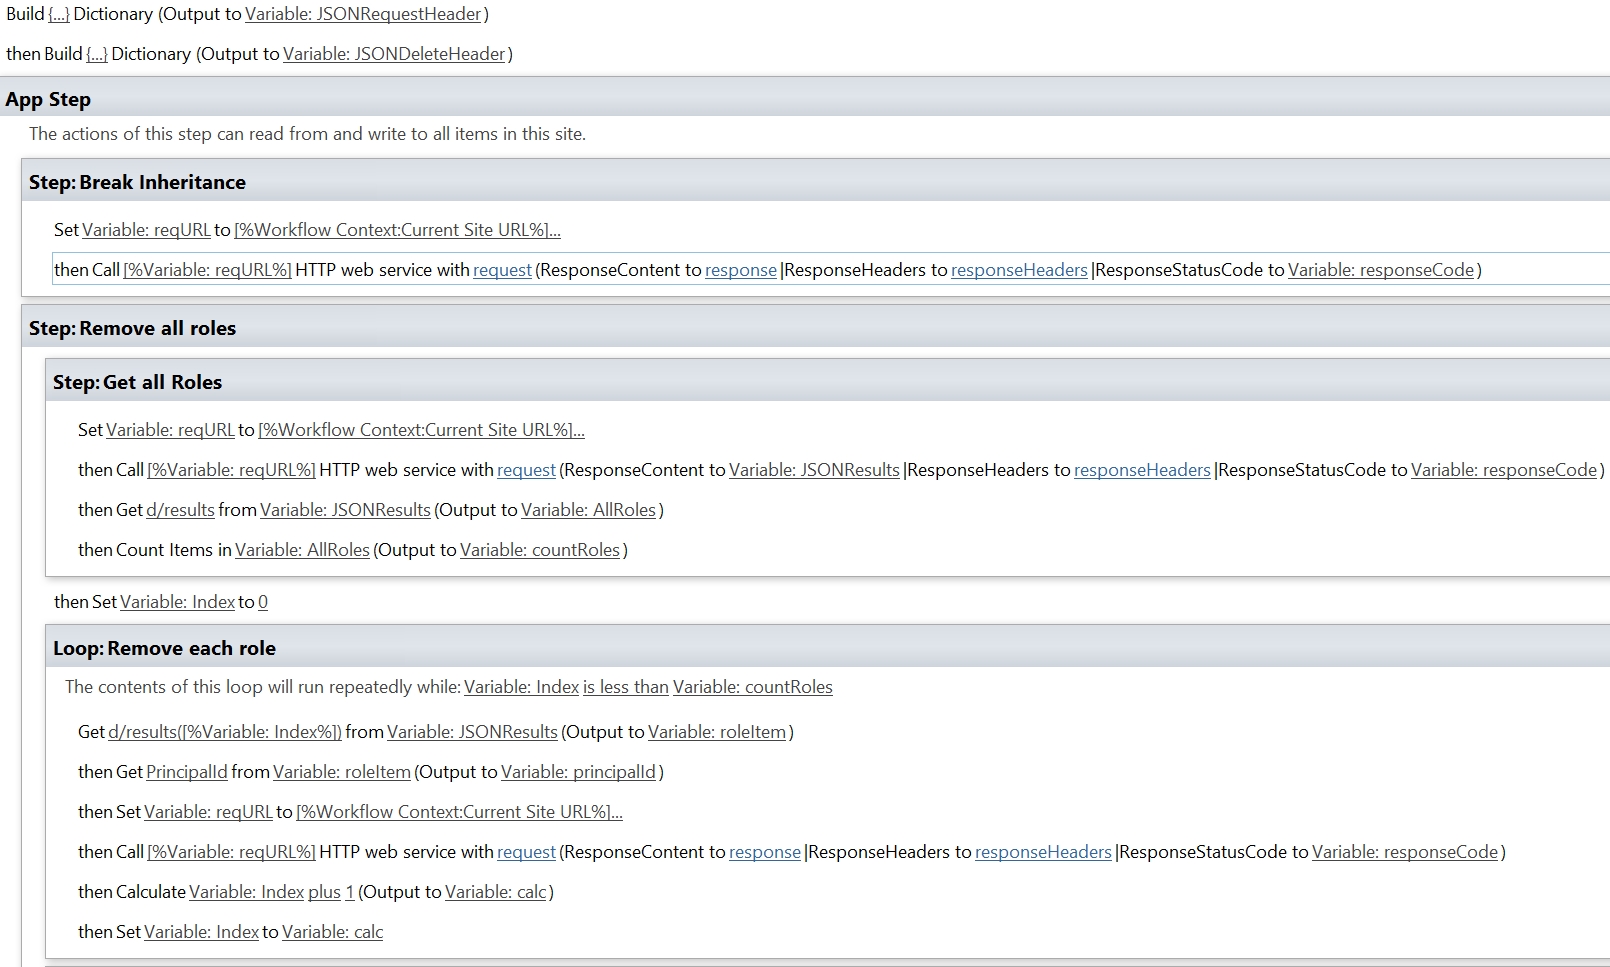
  35. The full workflow looks like this
SharePoint 2013 Workflow: Start a workflow using a REST call

SharePoint 2013 workflows do not have a default action to start another 2013 workflow. There is an action to start 2010 workflows, but for my solution I required the more advanced actions only available with SharePoint 2013  workflows. With the help of the call http web service action I was able to create a REST call that started the workflow. The solution was build on SharePoint Online (Office 365) using a SharePoint 2013 workflow.

The REST call workflow consist of three major parts;

  1. The HTTP web service URL
  2. The SubscriptionID of the workflow that needs to be started
  3. The itemID of the item on which the workflows needs to be started.

A side note: The workflow that is being started needs to be configured to start manually. I could not find any reference on MSDN about this, but without this option I would get an error message.

Solution

  1. Create a SharePoint 2013 workflow
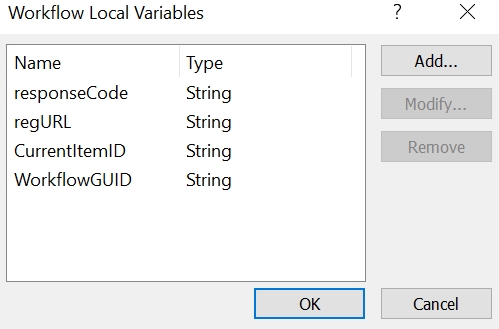
  2. Create a string variable called CurrentItemID
  3. Create a string variable called WorkflowGUID
  4. Create a string variable called regURL
    workflowvariables
  5. Now we need to find the SubscriptionID of the workflow we want to start. It is possible to use another REST call to find the SubscriptionID. But I prefer the following method.
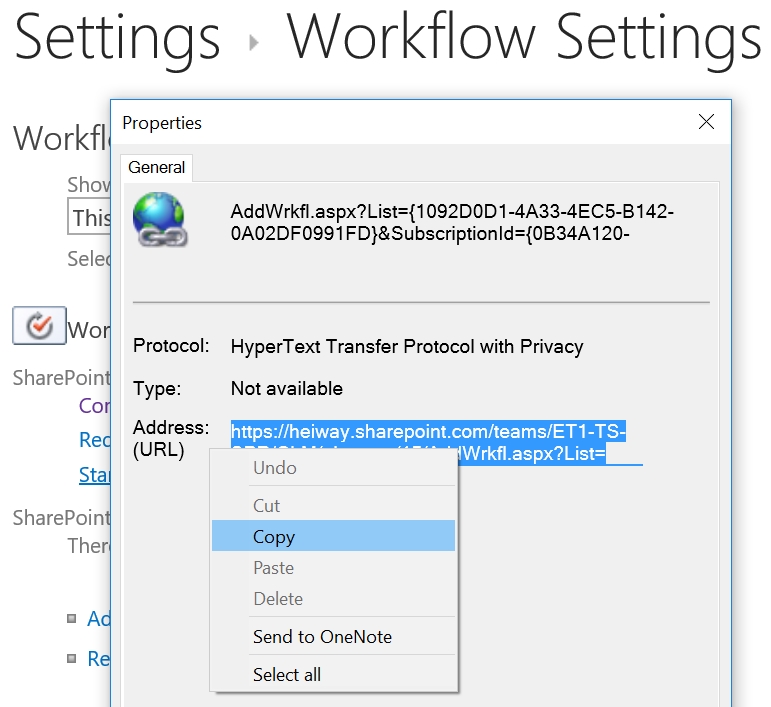
  6. Navigate to the workflow settings of the list where the workflow is located
  7. Right-click on the workflow and open the properties
  8. Copy the URL and find the SubscriptionID within the URL
    getsubscriptionid
  9. Set the variable WorkflowGUID with the found SubscriptionID
  10. Set the variable CurrentID with the ItemID of the current item or item on which the workflow needs to start.
    setvariables
  11. Then store the following URL to the variable regURL
    [%workflow Context: Current Site URL%]_api/SP.WorkflowServices.WorkflowInstanceService.Current/StartWorkflowOnListItemBySubscriptionId(subscriptionId='[%Variable: WorkflowGUID%]',itemID='[%Variable: CurrentItemID%]')
    
  12. Add the Call HTTP web service to the workflow and set the “this” to the regURL
  13. Set the HTTP Method to HTTP POST
    setcallhttpwebservice
  14. The workflow will now look like this
    fullwfstartanotherwf
  15. The app step is used to make sure the workflow has the required permissions. More details about the App Stepp will be explained in another blog post.


Office 365 New Group features

Microsoft is working hard to update Office 365 by adding new features and improving the overall user experience. One of my favorite changes is that (in most cases) it is no longer required to save changes and updates. A great number of actions no longer require the user to press a save or conformation button. This will prevents a lot of information being lost and speeds up work noticeable. It may seem a small change, but it has a great impact.

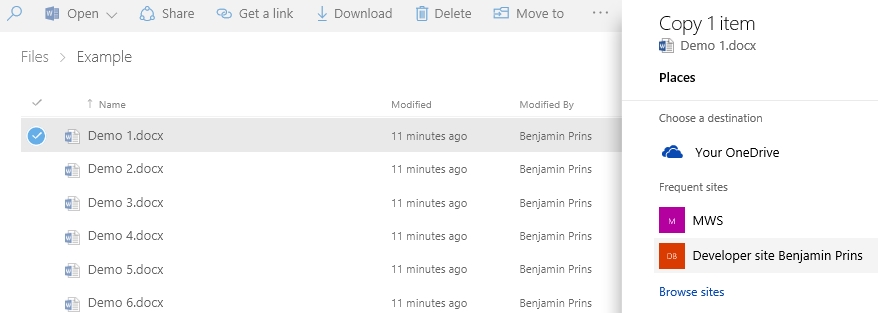
Copy document between libraries
With the modern library located on the One Drive it is possible to copy documents to libraries located on Groups. I expect this will be added to all the modern libraries, for now it only works on One Drive and only the copy action. The move action can only be used within modern libraries, not across groups.

select-copy-location

Changing views
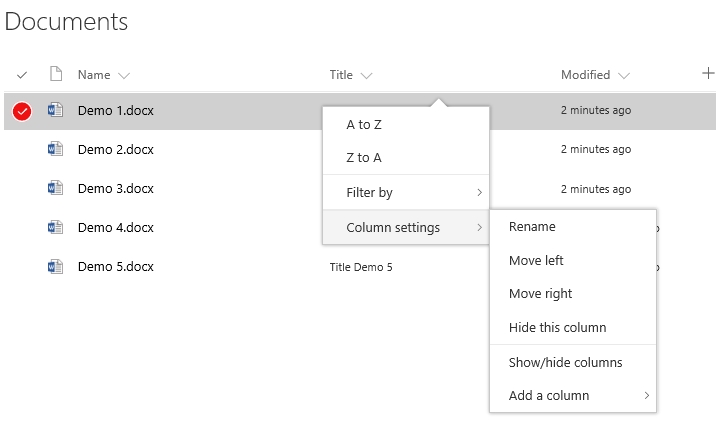
Changing existing views can be done fast and with great ease. Change the width of columns, sort order, filters, move columns and save the changes. Both the owner and member of the group are able to change the public views.

change-views

Full options in Groups
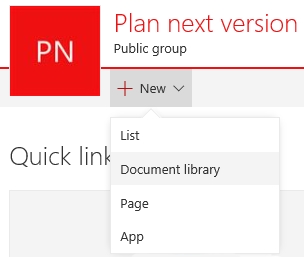
Group have been enhanced with the possibility to create new list, libraries and pages. This will create the possibility to create advanced team sites (groups) with full collaboration options.
create-lists

Pages within Groups
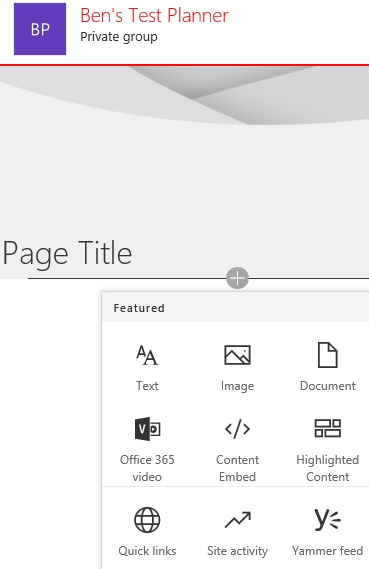
With a simple click a new site page can be created and with a user friendly interface the user can change the page. Image, documents, embedded content and even video’s are added through a easy to use menu. It is still possible to create wiki and web part pages through the new item action on the Site Pages library, the layout of these pages are not changed.

page-add-content

Guest users
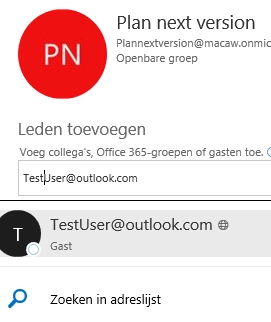
It is now possible to add external users to the group. For some features the users experience will be different for guest users, but they are able to be a full member of the group.

externalusers

SharePoint Online: A few new features

SharePoint 2016 contains a few new features. Here is a list of a few of these features which I am excited about.

File Size for uploads
The file size for uploads can be as large as 10 GB, with the previous file size being max. 2 GB.

List view threshold
The list view threshold is stated as greater than 5.000 and is different for specific actions. This will increase the performance of lists.

  • Specifies the maximum number of list or library items that a database operation, such as a query, can process at the same time outside the daily time window set by the administrator during which queries are unrestricted.
  • When adding or removing a column index, the threshold is 20,000 by default.
  • When deleting a list or folder, the threshold is 100,000 by default.
  • When renaming a folder within the same library, the threshold is 100,000 by default

Document library features
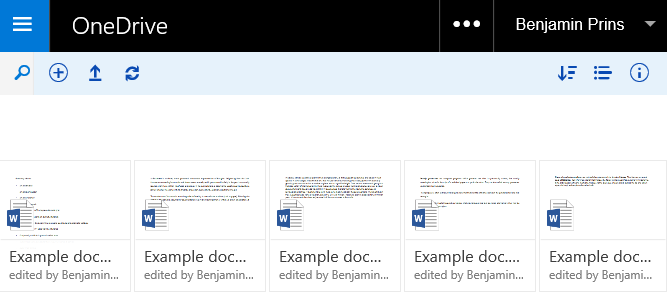
Change from details view to the new tiles view with a click.

Tile view

New ribbon with quick to access features

Ribbon

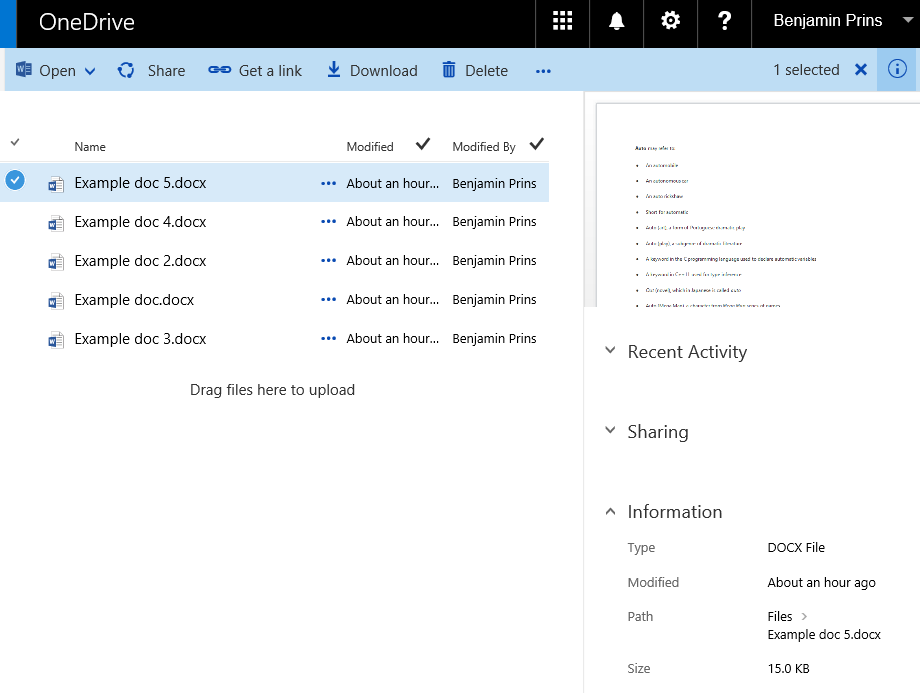
New details view per document, including editing properties and sharing information

Details per Document

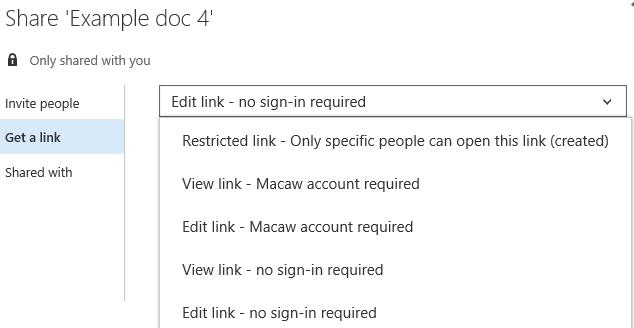
New and improved get (share) a link features, too easily send view and edit links.

Get a link

When uploading a document into a document set through the drag and drop feature, the document will be uploaded directly into the document set without the user opening the document set.

Move into DocumentSet

Existing documents can be move into a document set through the drag and drop feature, the document will be moved directly into the document set without the user opening the document set.

Move SP to Document Set

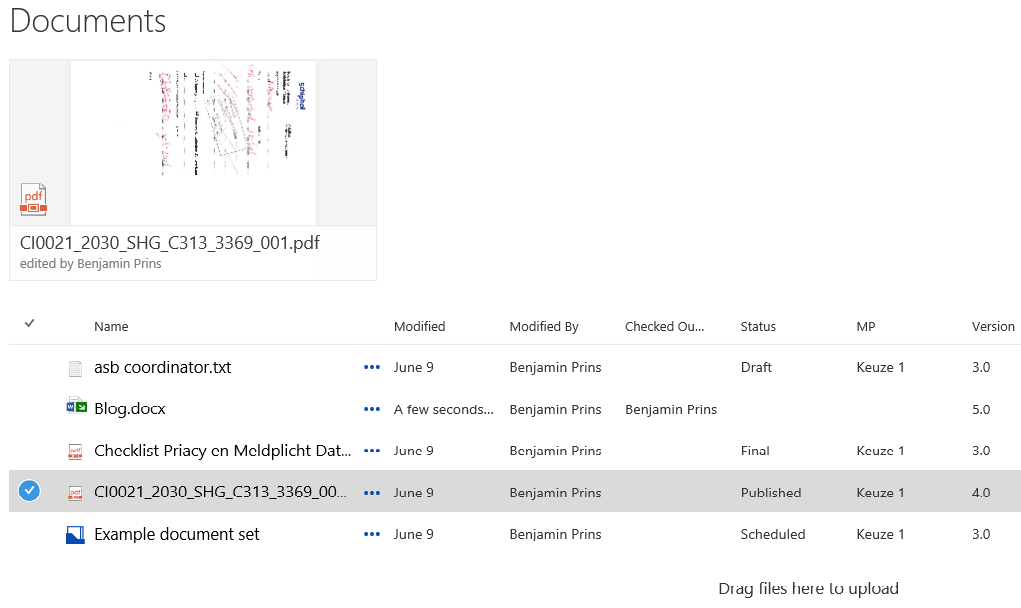
It is possible to pin documents to the top of the document library through the feature ‘Pin to top’. This will allow users to pin the most important documents on a very quick to access location.

Pin to top

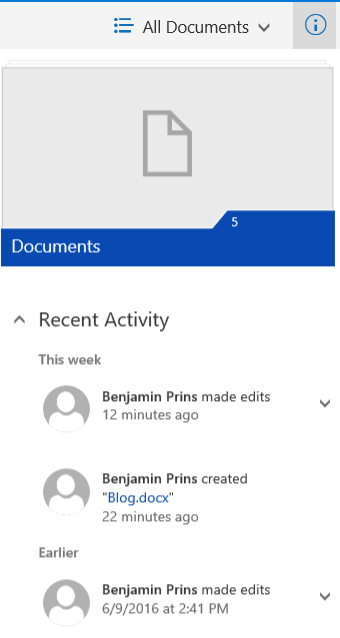
Every user is able to quickly see what the recent activities where within the document library.

Recent Activity

Turn scripting capabilities on

By default scripting capabilities are turned off in Office 365. This will prevent the use of a set of settings and a larger number of web parts.
The administrator of the environment can enable scripting in SharePoint admin center. When scripting is turned on it takes about 24 hours for the change to take effect.

Solution
1. Sign in to Office 365.
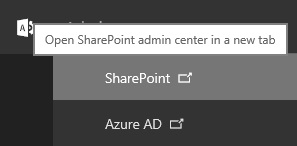
2. Open the admin center.
Open Admin Center
3. Open the SharePoint admin center.
Open SharePoint admin
4. Click on settings.
5. Set custom scripting to allow.
Allow scripting
6. Save the changes and wait 24 hours.

The following web part, features are settings are effected by the turning scripting on/off. When scripting is disabled (off) these functions will be unavailable to administrators.

Effect Web parts and features
Web Part Category Web Part
Blog Blog Archives
Blog Notifications
Blog Tools
Business Data Business Data Actions
Business Data Item
Business Data Item Builder
Business Data List
Business Data Related List
Excel Web Access
Indicator Details
Status List
Visio Web Access
Community About This Community
Join
My Membership
Tools
What’s Happening
Content Rollup Categories
Project Summary
Relevant Documents
RSS Viewer
Site Aggregator
Sites in Category
Term Property
Timeline
WSRP Viewer
XML Viewer
Document Sets Document Set Contents
Document Set Properties
Forms HTML Form Web Part
Media and Content Content Editor
Script Editor
Silverlight Web Part
Search Refinement
Search Box
Search Navigation
Search Results
Search-Driven Content Catalog-Item Reuse
Social Collaboration Contact Details
Note Board
Organization Browser
Site Feed
Tag Cloud
User Tasks
Master Page Gallery Can’t create or edit master pages
Publishing Sites Can’t create or edit master pages and page layouts


Effected sites settings
Site Feature Behavior Notes
Save Site as Template No longer available in Site Settings. You can still build sites from templates created before scripting was disabled.
Save document library as template No longer available in Library Settings. You can still build document libraries from templates created before scripting was disabled.
Solution Gallery No longer available in Site Settings. You can still use solutions created before scripting was disabled.
Theme Gallery No longer available in Site Settings. You can still use themes created before scripting was disabled.
Help Settings No longer available in Site Settings. You can still access help file collections available before scripting was disabled.
HTML Field Security No longer available in Library Settings. You can still use HTML field security that you set up before scripting was disabled.
Sandbox solutions Solution Gallery will not appear in the Site Settings so you can’t add, manage, or upgrade sandbox solutions. You can still run sandbox solutions that were deployed before scripting was disabled.
SharePoint Designer Site Pages: No longer able to update web pages that are not HTML.
Handling List: Create Form and Custom Action will no longer work.
Subsites: New Subsite and Delete Site redirect to the Site Settings page in the browser.
Data Sources: Properties button is no longer available.
You can still open data sources.
Uploading files that potentially include scripts The following file types can no longer be uploaded to a library
.asmx
.ascx
.aspx
.htc
.jar
.master
.swf
.xap
.xsf
Existing files in the library are not impacted.

SharePoint Online: Search refiners and searchable columns

Adding search refiners and creating searchable columns with SharePoint Online is a little bit different then with SharePoint 2013 on premise. In this blog post I will explain how to add search refiners and how to make custom columns searchable. There are 5 major parts we need to implement;

  • Create a custom column
  • Add some content
  • Map a crawled property to a refinable managed property
  • Created the alias
  • Configure the refiners

Solution

1. Create your custom column, for example Product.
2. Create some content with the custom column.
3. Wait for the column to be added as a crawled property, this might take up to 24 hours.
4. Open the SharePoint admin center and click on Search.
SharePointAdminCenter
5. Click on Manage Search Schema.
6. Depending on the type of column you will need to use different type of preset Managed Properties.

Managed property name Data type for mapping
RefinableDate00 – RefinableDate19 Dates.
RefinableDecimal00 – RefinableDecimal09 Numbers with max three decimals.
RefinableDouble00 – RefinableDouble09 Numbers with more than three decimals.
RefinableInt00 – RefinableInt49 Whole numbers.
RefinableString00 – RefinableString99 Strings, Person or Group, Managed Metadata, Choice and Yes/No

7. Search the related type on Managed Property.

RefinableString01
8. Click on Edit Map Property in het drop-down menu.
9. Add the Crawled property of the custom column, in our example it will be ows_Product.
AddMapping
10. Fill in the alias, this will make the column searchable.
11. Save the changes.
12. Close the SharePoint admin center and open the search center result page.
13. Set the page in edit modus and edit the Refinement web part.

EditRefinerWebPart
14. Click on Choose refiners… and add the managed property, in this example RefinableString01
15. Change the display name to the custom columns name, otherwise the refiner will be shown as RefinableString01
16. Search for some content and enjoy the result!

Result

SearchRefinerResult2